Create a lead pipeline
This tutorial connects the business decision, stage design, AI boundaries, and stale protections that make a pipeline safe to operate.
Before you begin, prepare one sentence describing who the pipeline serves, the intent or risk that starts it, and the concrete outcome it should reach.
Choose the type and outcome
Use Choose a pipeline type to select Prospect, Reactivation, one of the three Upsell types, or Retention Focus.
Write the terminal outcomes before the intermediate stages. Define what counts as Won, when staff should close the opportunity as Lost, and when a person is Disqualified. Won and Lost are pipeline stages; Disqualified is a terminal Lead status that closes the Lead without moving it to either stage.
Map the stages outside FitStack
Create the shortest stage sequence that reflects real decisions. For each stage, identify the entry condition, next job, driver, success evidence, destination, no-response plan, and time expectation.
Prepare agentic workflows
For every stage that should use AI, open Leads → Workflows. Clone a suitable template or build a custom workflow, review every path and required channel, then publish it.
Confirm that the intended AI agent has active configuration for every required channel. Draft workflows and agents missing a required channel cannot run as a valid stage assignment.
Start the pipeline
Open Leads → Pipelines, then select New Pipeline.
Enter a distinct name and a description that tells staff when to use this pipeline. Choose the type carefully; it cannot change after creation.
Set pipeline defaults
Expand pipeline settings and review:
- Inbound Fallback Agent — answers inbound replies only when the current stage has no AI agent; it does not advance Leads;
- Default Stale Days — the fallback inactivity window for stages without an override;
- Default Pipeline — routes default-based intake of this type here. Leave this off during initial creation so no Lead can enter before the second save is complete and verified.
Use only one intentional default for each pipeline type and club context.
Build the stage sequence
Keep Entry first, add Working or Closing stages, then retain Won and Lost as the terminal outcomes. Name stages for the Lead condition or business job.
Set a consistent probability and optional stage-specific stale window. FitStack auto-sorts Won and Lost to the end when you save.
Assign ownership and automation
Choose Manual when staff own the work. For an agentic stage, choose one published workflow and one capable AI agent.
Create the structural pipeline
Review the type, settings, stage names, order, probabilities, stale-day windows, and workflow assignments. Then select Create Pipeline and confirm the new card appears in the pipeline library.
The current creation flow needs a second save for the rest of each stage contract. Reopen the new pipeline before assigning test or production Leads.
Complete each agentic stage contract
For every agentic stage, expand Goal, write an observable Stage Goal, and set the success and optional failure destinations.
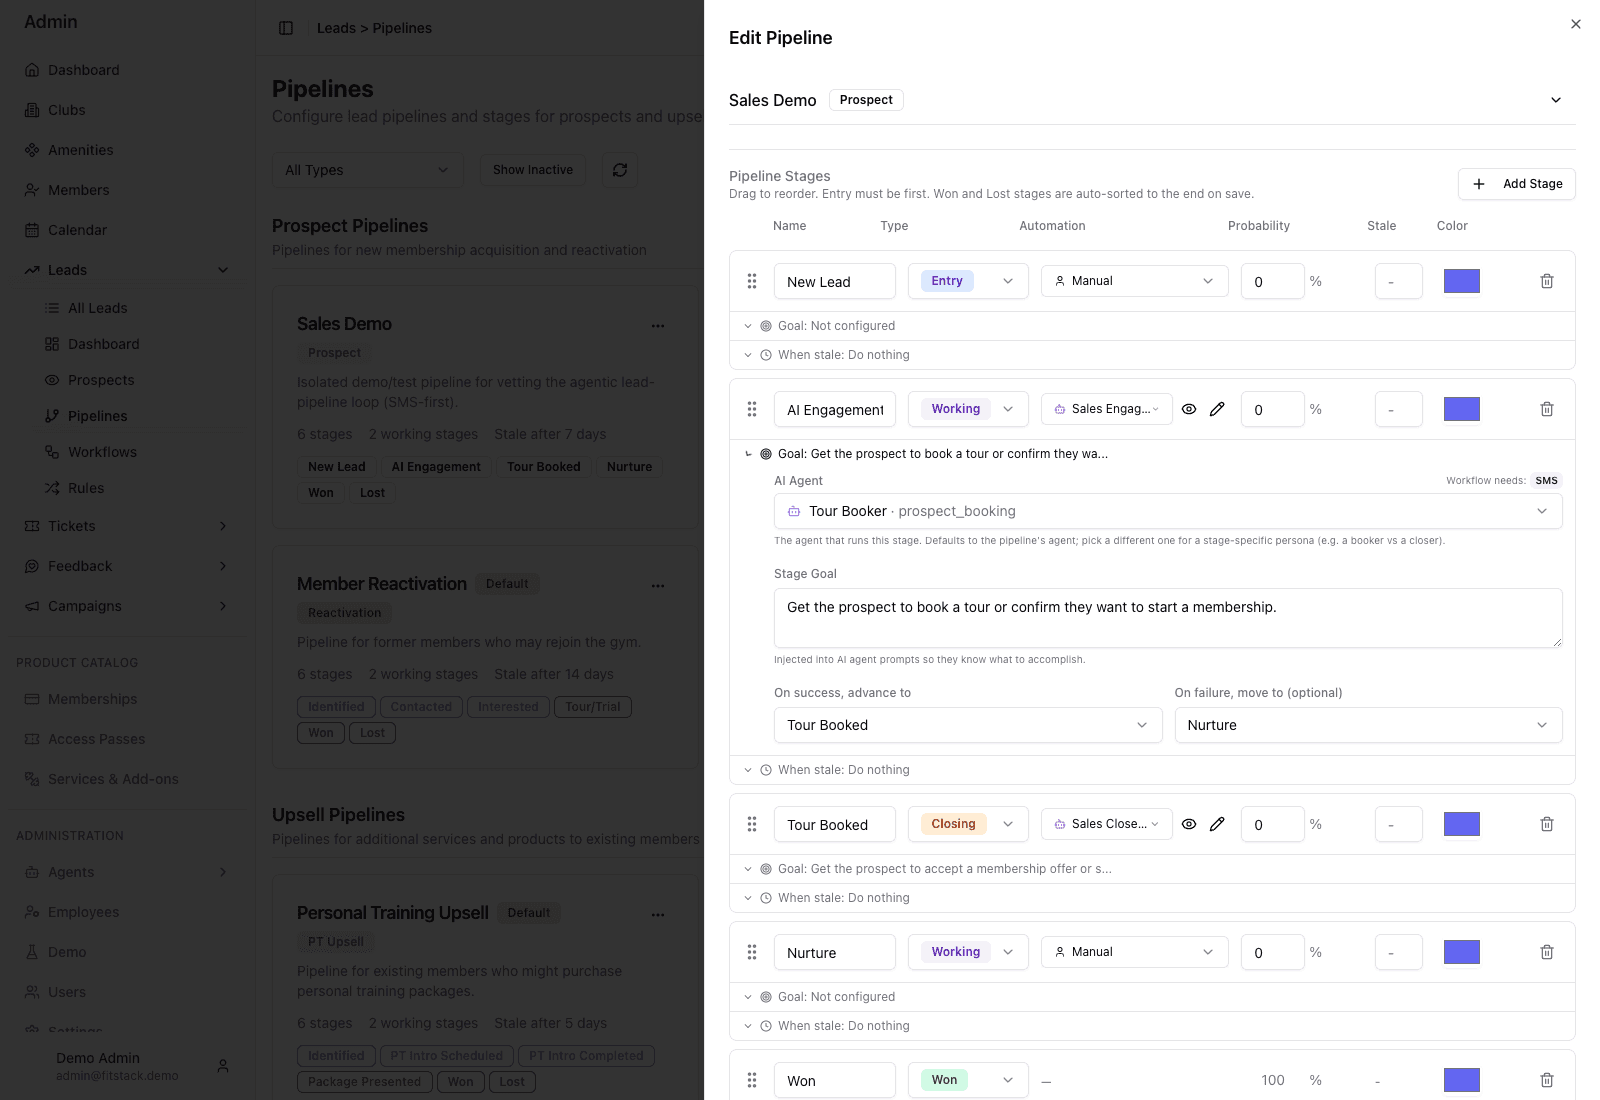
- 1Entry begins the lifecycle; Won and Lost remain terminal.
- 2Manual or one published workflow determines the stage driver.
- 3The selected agent must support the workflow’s channels.
- 4Success and failure routes complete the stage contract.
Configure stale behavior
For each configurable stage, expand When stale. Choose Do nothing, Move to stage, or Mark as Lost, then set any delay.
Make the stale window longer than the full expected workflow duration. Trace cycles and make sure every loop has accountable human review or an eventual exit. Select Save Changes, reopen the pipeline once more, and verify the goal, destinations, and stale action were retained.
Trace eight scenarios
Before testing, trace positive response, engaged without goal, no response, human intervention, staleness, Won, Lost, and Disqualified. Confirm each ends in a specific stage, terminal status, or named person’s queue.
Choose a supported test route
Return to the pipeline library and confirm the type, active status, stage order, stage count, and stale timing.
The current Add Lead form does not offer a pipeline selector. It routes the new Lead to the default pipeline for the selected Lead type.
For Prospect, Upsell, or Retention, choose a controlled cutover window. Record the previous default for rollback, tell the operating team, and account for any staff entry or system intake that could arrive during the test. Then use the new pipeline card menu to select Set as Default and confirm that its badge replaced the prior default.
Add Lead cannot test a Reactivation pipeline. Its Reactivation checkbox marks a Prospect Lead as a win-back but still routes it to the default Prospect pipeline. For Reactivation, leave the new pipeline non-default and use an approved Demo or non-production Journey opportunity whose destination explicitly selects this pipeline. Organizations with GymSales can instead coordinate a designated former-member test record through their configured Reactivation mapping. If neither controlled route is available, do not enable the pipeline; coordinate the test with the product owner.
Test and verify
For Prospect, Upsell, or Retention, immediately use Add Lead to create one controlled test Lead under your organization’s testing and data policies. For Reactivation, trigger the approved Journey or GymSales route chosen above.
Confirm that the test Lead entered this pipeline at the intended stage, then review its timeline, stage routing, ownership, and automation behavior.
If a default-routed test fails, restore the previous default before troubleshooting. If a Journey test fails, stop further test enrollment and review any in-flight enrollment before changing its destination. Do not leave a failing pipeline as the default or an active campaign destination.
Enable intake deliberately
Only after the stage contract is saved, reopened, and the type-appropriate test passes should the new pipeline receive normal intake. Keep it as the default only if that is the intended operating model. Configure Broadcast or Journey handoffs after the same verification, then monitor the first real Leads and keep the previous default available for a controlled rollback.
Creating a pipeline, publishing a workflow, changing a default, and assigning Leads are persistent actions. Coordinate them with the team that owns sales or retention operations.
Definition of ready
The pipeline is ready when staff can answer:
- which opportunity belongs here;
- who or what owns every stage;
- what the agent may do and what requires a human;
- how success, failure, engagement, and no response route;
- when a Lead becomes stale;
- how Won, Lost, and Disqualified are decided;
- where activity and exceptions will be reviewed.